Showing posts with label barrym. Show all posts

Thursday, 17 July 2014

Current favourite nail varnish - Barry M


Just going to show you some pictures of my favourite nail varnish at the moment!


It's really glittery and sparkles in the sun, the colour is a neutral pink shade that will go with most outfits so there's no need to worry about it clashing with anything you wear!


Only downside is it's quite rough on the nails, but it looks really pretty! So who cares!?


Wednesday, 11 June 2014

Neon orange nails

Just replaced my ladybird nails with bright neon orange Gelly nails Barry M.


I've chosen to keep the zig zag nail and just touch it up!


I think this colour works really well an is great for summer. The gelly Barry m gives  the nails a great shine!


Perfect summer nails! Orange for when the sun is shining!

Zoe x

Wednesday, 4 June 2014

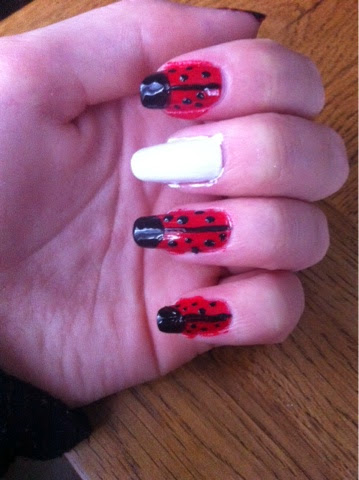
Ladybird Nails


Above shows the final look I've created, a ladybird zig zag design!


Starting with Ciate Mistress I applied one coat to my nails.


I made sure to leave the middle finger as the zig zag design will be going onto that nail.


The first coat is very thin and another layer will need to be applied. 


After that I applied Barry M white coat to the middle finger. 


Above shows the first coat! Again, this needs another layer on top as the white coat is too thin with just the one layer. 


Above shows two coats applied to the white nail! Giving it a much better look.


I've chosen to use the above brush from the set shown below. 


I've chosen to use that brush as it's easy to work with and will work best when creating the top of the ladybird. 


Using Black Barry M, I dipped the brush into the pot and gradually bit by bit created a round semi circle for the face of the ladybird. 


I then repeated this step on the rest of the nails. Excluding the white middle finger.


I then needed to create the wings by doing a straight line from the black semi circle to the base of the nail.


Using my second brush, a very straight brush. I dipped this into the black nail polish and drew a straight neat line.


I then applied the dots to the nails using the below dotting tool.


I dipped the brush in the black and applied dots in a variety of places. 


Now for the eyes!


Using the same clean dotting tool I then applied larger white dots to create the eyes of the ladybird, as shown above!


I then applied small black dots to the white part of the eyes. Stickers can be bought here!


Using the above zig zag labels I then applied these to the middle white finger. 


It's important to make sure they're stuck on correctly. I then applied a black coat covering the stickers.


I then peeled off the stickers instantly. And below is the finished look after being touched up with a cotton bud.


🐞


Wednesday, 14 May 2014

French Manicure

I wanted to do a French manicure on my nails for a whole and could never get the white nail varnish perfectly curved or to look even remotely good!

I read a nail tip in a magazine, the magazine said to create the perfect French manicure... Use hole reinforcer's! 


Start by filing your nail, I tend to file mine square to make them look false and perfect, but you can file them round if you want a more natural look.

Stick the hole reinforcer's just slightly below where the top of the nail has grown past the skin. Don't worry if when you paint it goes wrong you can touch it up using a clear varnish and a cotton bud with nail varnish remover applied to it.

Once the hole reinforcer's are on, paint the top part of the nail white, wait a few seconds then peel off. Do not leave for too long because the hole reinforcer will get stuck and create a jagged edge.


I've used BarryM white nail paint to create the French tip and then Ciate Underwear as the clear coat to make the nail shine but still look natural at the same time. The hole reinforcers can be bought from most stationary shops, I'd recommend WhSmith! But eBay sell them too! 


Above shows the final look! This is a really easy way to create the French manicure and looks really classy, this look would work well for weddings or for general wear. 


Wednesday, 7 May 2014

Ombre nails

I wanted to try out the latest craze - ombre nails out for myself, I think this looks really good and if you make a mistake you can always cover it up using a glittery nail varnish!

I've chosen to use 3 shades of pink! These shades are ciate, Barry M and w7, it's important to pick 3 colours that are slightly similar in colour! 

To start with I painted the nail white and then applied a second layer of white Barry M.
Then once dried I applied my three shades of pink to a sponge. 
Make sure each shade is even and you do the shades in the right order! Starting with the darkest pink and finishing with the lightest. 

Sponge onto the nails, it's ok to make a mess! You can use a cotton bud to get rid of the messy edges. 

Apply a second layer of the sponge to your nails and then clean up around the edges, once fairly neat, then apply a coat of glitter nail varnish to make the colours blend and hide any mistakes!