Friday, 13 June 2014

Loreal Confetti speckled egg


Using loreal confetti and Ciate Amazing Gracie, I've decided to create a speckled egg look on my nails!


Starting with Loreal Confetti, I applied one coat to the nails.

This is how it should look! 

I've used too much confetti on one of the nails so I've chosen to remove some as I think it looks a bit too fussy!
I then applied ciate Amazing Gracie over the top of the nails!


I applied one coat, and then continued to apply coats until you can hardly see the confetti!

Below shows how the nails looked after a third coat of Ciate! 

I then applied some more confetti to go over the top to show some darker speckles and overlay the confetti.


Wednesday, 11 June 2014

Neon orange nails

Just replaced my ladybird nails with bright neon orange Gelly nails Barry M.


I've chosen to keep the zig zag nail and just touch it up!


I think this colour works really well an is great for summer. The gelly Barry m gives  the nails a great shine!


Perfect summer nails! Orange for when the sun is shining!

Zoe x

Wednesday, 4 June 2014

Ladybird Nails


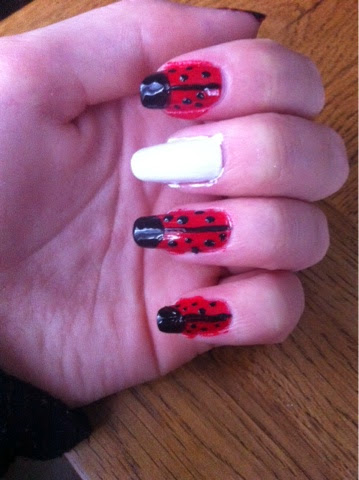
Above shows the final look I've created, a ladybird zig zag design!


Starting with Ciate Mistress I applied one coat to my nails.


I made sure to leave the middle finger as the zig zag design will be going onto that nail.


The first coat is very thin and another layer will need to be applied. 


After that I applied Barry M white coat to the middle finger. 


Above shows the first coat! Again, this needs another layer on top as the white coat is too thin with just the one layer. 


Above shows two coats applied to the white nail! Giving it a much better look.


I've chosen to use the above brush from the set shown below. 


I've chosen to use that brush as it's easy to work with and will work best when creating the top of the ladybird. 


Using Black Barry M, I dipped the brush into the pot and gradually bit by bit created a round semi circle for the face of the ladybird. 


I then repeated this step on the rest of the nails. Excluding the white middle finger.


I then needed to create the wings by doing a straight line from the black semi circle to the base of the nail.


Using my second brush, a very straight brush. I dipped this into the black nail polish and drew a straight neat line.


I then applied the dots to the nails using the below dotting tool.


I dipped the brush in the black and applied dots in a variety of places. 


Now for the eyes!


Using the same clean dotting tool I then applied larger white dots to create the eyes of the ladybird, as shown above!


I then applied small black dots to the white part of the eyes. Stickers can be bought here!


Using the above zig zag labels I then applied these to the middle white finger. 


It's important to make sure they're stuck on correctly. I then applied a black coat covering the stickers.


I then peeled off the stickers instantly. And below is the finished look after being touched up with a cotton bud.


🐞


Sunday, 1 June 2014

Ciate Frost Yourself!

 Using Rimmel Lasting Finish nail varnish, I first applied one layer of blue, I then applied a second and a third! It doesn't matter if it's messy because you can remove the excess polish with a cotton bud and nail varnish remover.

Below shows stage one of one layer, stage two - two layers. And the final stage, a third layer.


However, I decided to remove the polish from the middle finger and paint that using Ciate - fit for a queen nail polish as shown below. This is a silver nail polish and shines whatever the weather. I'm also using Ciate - Frost Yourself this can only be bought when purchasing the mini mani month advent calendar.
When applying Ciate frost yourself, you must make sure the undercoat is wet and thick, this is so the little caviare beads stick firmly and don't move.


Above shows the final look! remember to add a top coat to make sure the beads stay on properly!